Google analytics plugins for wordpress
Impletenting and accessing the google analytics data from wordpress make it more easier for anyone to track the progress of website seo work. Not only that it also help to find the semi detailed reports like which pages are mostly viewed, how many pages viewed, no of visitors page speed etc. Google has its own plugin for wordpress which help to install the same with some basic information and integration method.In this post we will discussed about the benefits and how to setup Google analytics plugins for wordpress.
Best Practices for Google Analytics in WordPress:
Implementing Google Analytics in WordPress is just the beginning. To ensure that you’re making the most of this powerful tool and maintaining accurate data, follow these best practices:
- Use a Reliable Plugin: Choose a reputable Google Analytics plugin for WordPress like MonsterInsights, GA Google Analytics, or Analytify. These plugins simplify the integration process and offer additional features for tracking and reporting.
- Configure Goals and E-commerce Tracking: Set up goals and e-commerce tracking within Google Analytics to measure specific actions and conversions on your website. This helps you understand user behavior and track key performance indicators.
- Enable Enhanced E-commerce Tracking (If Applicable): If you run an online store, enable enhanced e-commerce tracking to gain in-depth insights into product performance, shopping behavior, and sales data.
- Anonymize IP Addresses: Consider enabling IP anonymization to protect user privacy. This feature ensures that Google Analytics collects only partial IP addresses, making it compliant with data protection regulations like GDPR.
- Exclude Internal Traffic: Exclude your IP address or any internal traffic from being tracked by Google Analytics. This prevents your own visits from skewing your data.
- Set Up Custom Dimensions and Metrics: Use custom dimensions and metrics to track specific user interactions or attributes that are essential to your website’s goals. This allows for more detailed analysis.
- Implement Cross-Domain Tracking: If your website spans multiple domains (e.g., a main site and a subdomain), set up cross-domain tracking to accurately measure user journeys across these domains.
- Regularly Update Your Plugin: Keep your Google Analytics plugin, as well as WordPress core and other plugins, up to date to ensure compatibility and security.
- Monitor Site Speed: Use Google Analytics to monitor your website’s page load times. Slow-loading pages can negatively impact user experience and SEO rankings.
- Create Custom Reports and Dashboards: Customize reports and dashboards to focus on the specific metrics that matter most to your website. Share these reports with your team or clients for easy access to essential data.
- Set Up Alerts: Create custom alerts in Google Analytics to receive notifications when unusual or important events occur, such as a sudden traffic spike or a significant drop in conversions.
- Regularly Review Data: Make data analysis a regular practice. Set aside time to review your Google Analytics reports and look for trends, anomalies, and areas for improvement.
- Integrate Google Analytics with Other Tools: Connect Google Analytics with other marketing and analytics tools, such as Google Search Console and Google Data Studio, to gain a holistic view of your website’s performance.
- Optimize for Mobile: Ensure that your website is mobile-friendly, as mobile traffic continues to grow. Use Google Analytics data to monitor and improve the mobile user experience.
- Stay Informed: Stay updated on changes to Google Analytics and digital marketing best practices. Continuous learning ensures that you’re using the latest features and strategies effectively.
- Implement Content Grouping: Use content grouping in Google Analytics to categorize your website’s content logically. This can help you understand which content performs best and identify content gaps.
- Regularly Export and Backup Data: Periodically export your Google Analytics data and create backups. This ensures that you have historical data available even if you encounter issues with your Google Analytics account.
- Follow Legal and Ethical Guidelines: Adhere to legal and ethical guidelines when collecting and using data. Comply with privacy regulations and obtain user consent if necessary.
By following these best practices, you can maximize the value of Google Analytics for your WordPress website, make informed decisions, and continually improve your website’s performance and user experience.

Using Google Analytics Data for Website Improvement
Utilizing Google Analytics data for website improvement is crucial for optimizing your site’s performance, enhancing user experience, and achieving your online goals.By using Google Analytics data as a foundational tool for website improvement, you can make data-driven decisions, enhance user experience, and achieve your online objectives effectively. Regular analysis and optimization will lead to a more successful and user-friendly website over time.
Using Google Analytics Data for Website Improvement
- Access Google Analytics Dashboard:
- Log in to your Google Analytics account and navigate to the dashboard of the website you want to analyze.
- Define Your Goals:
- Before diving into the data, establish clear objectives for your website. These could include increasing conversions, reducing bounce rates, or improving engagement metrics.
- Review Audience Insights:
- Analyze the “Audience” section to gain insights into your visitors.
- Demographics: Understand the age, gender, and location of your audience. Use this data to tailor content and campaigns.
- Interests: Discover your audience’s interests and create content that aligns with their preferences.
- Devices: Determine which devices (desktop, mobile, tablet) your visitors use most. Ensure your website is optimized for these devices.
- Analyze the “Audience” section to gain insights into your visitors.
- Examine Acquisition Sources:
- In the “Acquisition” section, evaluate where your traffic is coming from.
- Organic Search: Assess the performance of your SEO efforts. Identify top-performing keywords and landing pages.
- Referral Traffic: Discover which external websites are sending traffic to yours. Nurture relationships with high-performing referral sources.
- Social Media: Analyze which social media platforms drive the most traffic and engagement. Tailor your social media strategy accordingly.
- Paid Advertising: Evaluate the ROI of paid advertising campaigns. Adjust budgets and targeting based on successful channels.
- In the “Acquisition” section, evaluate where your traffic is coming from.
- Evaluate Behavior Data:
- Explore the “Behavior” section to understand how users interact with your site.
- Pageviews: Identify your most popular pages. Optimize them for conversions or add calls to action.
- Bounce Rate: High bounce rates indicate pages that may need improvement. Focus on enhancing content and user experience.
- Site Speed: Monitor page load times. Slow-loading pages can lead to higher bounce rates. Optimize images and minimize scripts for faster performance.
- Explore the “Behavior” section to understand how users interact with your site.
- Set Up Goals and Conversions:
- If you haven’t already, create specific goals and conversion tracking within Google Analytics. Goals can be related to form submissions, downloads, or e-commerce transactions.
- Analyze goal completion rates and identify bottlenecks in the conversion process.
- Utilize Event Tracking (If Applicable):
- Implement event tracking to monitor user interactions such as clicks on specific buttons, video views, or downloads.
- Use event tracking data to enhance user experience and drive desired actions.
- Create Custom Reports and Dashboards:
- Customize reports and dashboards within Google Analytics to focus on key metrics aligned with your goals.
- Share these reports with your team or stakeholders for better collaboration.
- Implement A/B Testing:
- Use Google Analytics data to identify pages or elements that need improvement.
- Conduct A/B tests to experiment with changes and measure their impact on user behavior and conversions.
- Regularly Monitor and Adjust:
- Website improvement is an ongoing process. Continuously monitor Google Analytics data to identify trends and opportunities.
- Adjust your strategies, content, and website design based on the insights you gather.
- Seek User Feedback:
- Combine quantitative data from Google Analytics with qualitative insights from user feedback surveys or usability testing to gain a comprehensive understanding of user behavior and preferences.
- Document and Share Insights:
- Document your findings and actions taken to improve the website. Share these insights and results with your team and stakeholders.
- Stay Informed:
- Keep up with industry trends and changes in user behavior. Adapt your website improvement strategies accordingly.
Configuring Google Analytics for WordPress Plugins
- Access Your WordPress Dashboard:
- Log in to your WordPress website’s admin dashboard using your username and password.
- Install and Activate a Google Analytics Plugin:
- If you haven’t already installed a Google Analytics plugin, navigate to the “Plugins” section in your WordPress dashboard.
- Click on “Add New” and search for a suitable Google Analytics plugin. Popular options include “MonsterInsights,” “GA Google Analytics,” and “Analytify.”
- Install and activate your chosen plugin.
- Plugin Setup Wizard (If Applicable):
- Some plugins, like MonsterInsights, offer a setup wizard to streamline the process. If presented with a setup wizard, follow the on-screen instructions to configure the plugin.
- Typically, you’ll need to connect your Google Analytics account by signing in with your Google credentials. The plugin will request necessary permissions.
- Manual Configuration (If No Setup Wizard):
- If your plugin doesn’t have a setup wizard, access its settings via the WordPress dashboard. Look for the “Settings” or “Analytics” tab in your plugin menu.
- Enter Your Google Analytics Tracking ID:
- Locate the field where you can enter your Google Analytics Tracking ID (also known as UA code or Property ID).
- You can find your tracking ID in your Google Analytics account (Admin > Property > Tracking Info > Tracking Code).
- Copy and paste the tracking ID into the corresponding field in the plugin settings.
- Select Tracking Options (If Available):
- Depending on the plugin, you may have options to enable or disable various tracking features, such as enhanced link attribution, outbound link tracking, or file download tracking. Configure these settings based on your needs.
- Enable E-commerce Tracking (If Applicable):
- If your website is an e-commerce site, ensure that you enable e-commerce tracking within the plugin settings.
- Configure additional e-commerce-related settings, such as tracking product details and transactions.
- Set Up Goals and Events (Optional):
- Some plugins allow you to set up goals and events directly within WordPress. This can be useful for tracking specific user interactions, such as form submissions or button clicks.
- Follow the plugin’s instructions to create and configure goals or events.
- Customize Tracking for Specific Content (If Available):
- Some plugins offer the ability to exclude specific content or user roles from tracking. Configure these options if needed to refine your tracking data.
- Save Settings:
- After configuring all the necessary options, don’t forget to save your plugin settings.
- Verify Tracking:
- To ensure that Google Analytics tracking is working correctly, visit your website and navigate through various pages while logged into your Google Analytics account. In Google Analytics, go to “Realtime” and check if you see live user data.
- Regularly Review and Analyze Data:
- Make it a habit to regularly review your Google Analytics data to gain insights into your website’s performance. Use the data to make informed decisions and optimize your website accordingly.
Configuring Google Analytics for WordPress Plugins – In-Depth Guide
- Access Your WordPress Dashboard:
- Start by logging into your WordPress admin dashboard. You should have administrative access to your WordPress website.
- Select the Right Google Analytics Plugin:
- Choose a Google Analytics plugin that suits your needs. Consider factors such as ease of use, features, and compatibility with your WordPress version.
- Popular options include MonsterInsights, GA Google Analytics, and Analytify.
- Install and Activate the Plugin:
- Navigate to the “Plugins” section in your WordPress dashboard.
- Click “Add New,” search for your chosen Google Analytics plugin, and click “Install Now.” After installation, click “Activate” to enable the plugin.
- Access Plugin Settings:
- Typically, you can access the plugin’s settings from the WordPress dashboard menu. Look for options like “Settings,” “Analytics,” or the plugin’s name.
- Connect to Google Analytics:
- If your plugin provides a setup wizard, follow the on-screen instructions. This usually involves linking your Google Analytics account.
- If there’s no setup wizard, you’ll likely find a field to enter your Google Analytics Tracking ID (UA code). Copy and paste your tracking ID from your Google Analytics account (Admin > Property > Tracking Info > Tracking Code).
- Tracking Options:
- Configure tracking options based on your requirements. This may include enabling enhanced link attribution, outbound link tracking, or file download tracking.
- Consider enabling anonymized IP addresses if you’re concerned about user privacy.
- E-commerce Tracking (If Applicable):
- If your website is an online store, ensure e-commerce tracking is enabled in the plugin settings.
- Configure settings related to tracking product details, transactions, and revenue.
- Goals and Events (Optional):
- Some plugins allow you to set up goals and events directly within WordPress.
- Define specific goals, such as tracking form submissions or successful purchases.
- Configure event tracking for user interactions like button clicks or video views.
- Custom Dimensions and Metrics (Advanced):
- If you’re comfortable with advanced tracking, explore the option to set up custom dimensions and metrics within the plugin.
- Custom dimensions can track specific user data, while custom metrics can measure unique interactions.
- Advanced Tracking Features:
- Some plugins offer advanced features like tracking scroll depth, user engagement, or AdWords integration. Review and configure these as needed.
- Exclude Content or Users (Advanced):
- If you want to exclude specific content (e.g., admin pages) or user roles (e.g., editors) from tracking, check if the plugin provides such options.
- Save Settings and Verify Tracking:
- After configuring all settings, click “Save” or “Update” to save your changes.
- To verify that tracking is working correctly, visit your website and navigate through various pages while logged into your Google Analytics account. In Google Analytics, check the “Realtime” section for live user data.
- Regular Data Analysis and Reporting:
- Make data analysis a routine task. Regularly review Google Analytics reports to gain insights into your website’s performance.
- Create custom reports and dashboards within Google Analytics to focus on specific metrics that matter to you.
- Stay Updated and Maintain the Plugin:
- Keep your Google Analytics plugin and WordPress core updated to ensure compatibility and security.
- Check for plugin updates and apply them as needed.
- Seek Support and Tutorials:
- If you encounter issues or need assistance, refer to the plugin’s documentation, support forums, or online tutorials. Many plugins have active communities that can help you troubleshoot.
By following these steps, you can successfully configure Google Analytics for your WordPress website using a plugin. These plugins simplify the setup process and provide valuable insights into your website’s traffic and user behavior.
Step 1: Login to your WordPress dashboard and go to Plugins → Add New and in the search box, type “Google Site Kit”. Install and activate the plugin.
Step 2: Once you activate the plugin, you’ll be prompted to start its setup process. Click on Start Setup to begin the setup process of the Google Site Kit plugin.
Step 3: When you click on the Start Setup button in the previous step, a new tab opens, loading the Google Site Kit configuration page. Click on Sign in with Google to continue.
Step 4: Sign in with the relevant Google account. If you closely notice the screenshot above, you’ll see that I’ve used my personal email to sign it (which is the master account for all my Google properties).
Step 5: Site Kit will ask for various permissions to access your connected Google services such as Search Console, etc. Click on Allow to proceed to the next step.
Step 6: Upon successful configuration, you’ll see a screen similar to the one shown above. This confirms that:
- You’re the proper owner of your site’s domain and that your domain is configured in Search Console.
- Site Kit can access your general Google Account data and your Search Console data. It does not have access to data from other properties such as Google Analytics, etc. This means that you’ll have to give individual permissions for each property that you want to link.
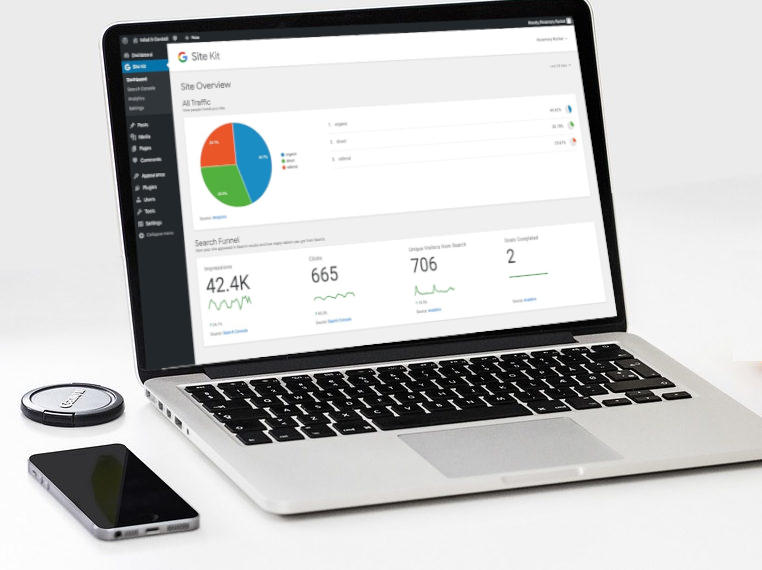
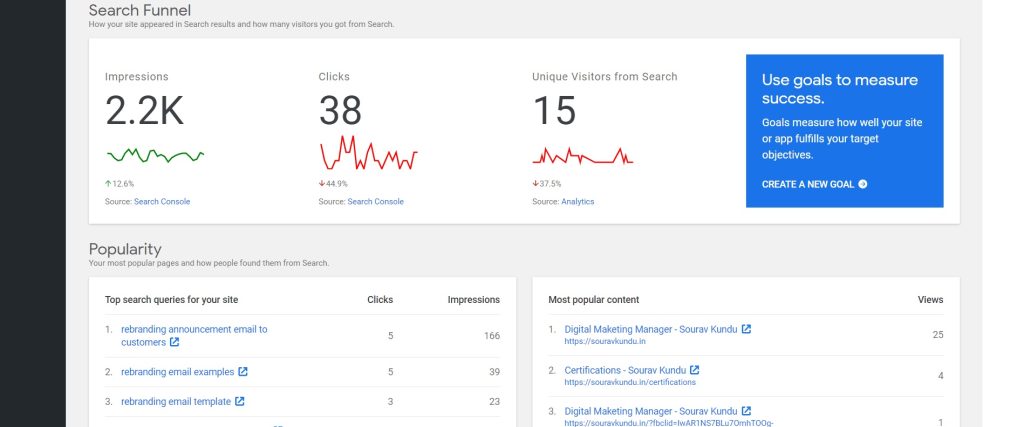
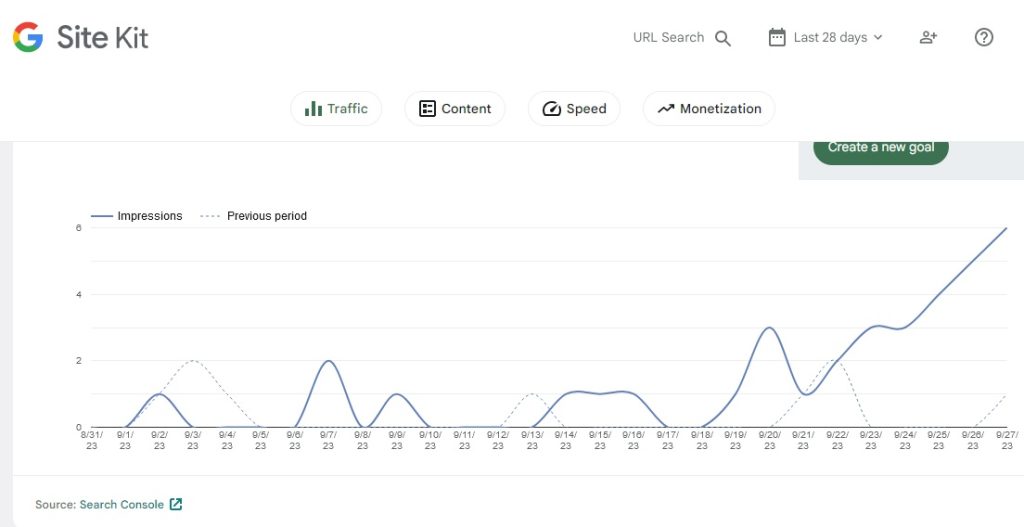
Step 7: At this stage, only the Google Search console data is linked, as shown in the screenshot above.
Step 8: You can view your site’s detailed Search Console data in the Site Kit → Search Console page.
It will take some time to integrate all these once by one. But if some of these are missed on not integrate in first step then go for the settings and choose which one not installed. Click on that and follow the process to do the rest of the integration.