
how to make facebook private
In the introduction, you want to engage the reader by addressing the growing concerns about online privacy and the importance of securing personal information on social media platforms like Facebook. You might mention recent privacy scandals and breaches, making it clear why users need to know how to make their Facebook profiles more private.Facebook has various settings to make the post stpry and images more appealing, secure, or some time based on user choice. Though facebook is a popular open social media and everyone like to share there daily status yet here we will discussed about step-by-step instructions on how to make facebook private to handle the privacy.
Understanding Facebook Privacy Settings:
Begin with an explanation of Facebook’s privacy settings and why they matter. Discuss how these settings allow users to control who sees their posts and profile information. Mention that understanding these settings is the first step toward enhancing privacy on Facebook.
Accessing Your Facebook Privacy Settings:
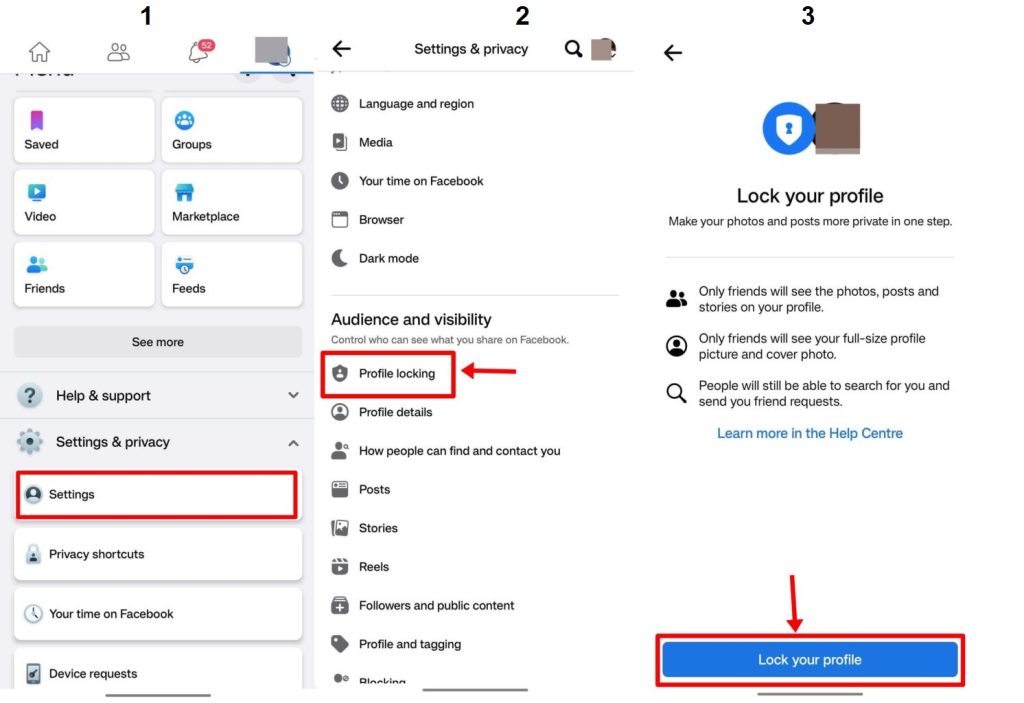
Provide clear, step-by-step instructions on how users can access their privacy settings on Facebook. You can explain that these settings are accessible through the Facebook app or website and guide users through the process with screenshots or images.
Setting Privacy for Your Posts:
Detail how users can control the visibility of their posts. Explain the different audience options, including “Public,” “Friends,” “Only Me,” and custom settings. Offer practical examples to help users understand when to use each option, such as sharing personal updates with friends only or making professional content public.
Managing Your Profile Privacy:
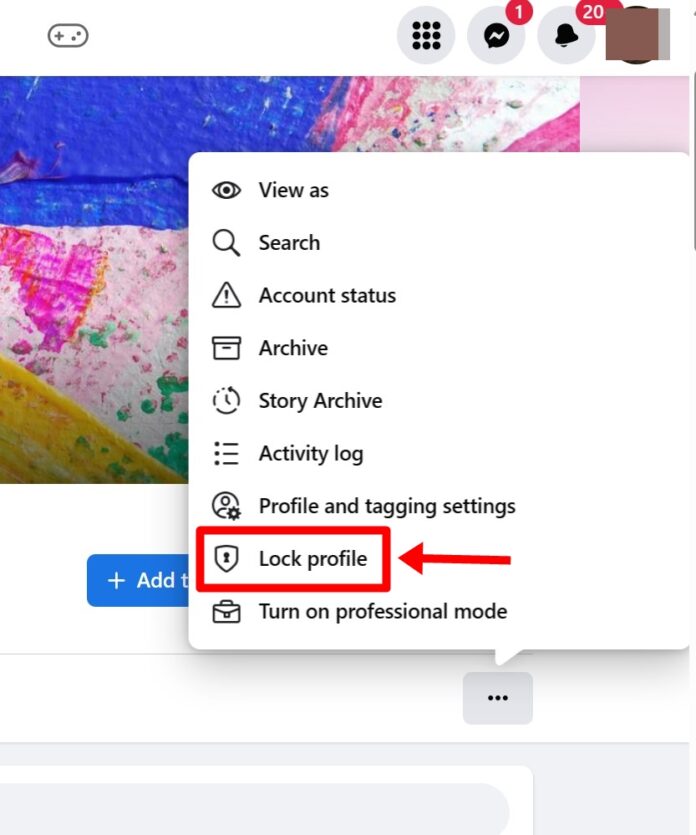
Guide users on how to manage the privacy of their Facebook profiles. Explain that they can control who can see their profile picture, cover photo, contact details, and other personal information. Emphasize the importance of limiting access to sensitive data.
Controlling Tagging and Timeline:
Explain how users can manage tagging and timeline settings. Discuss options for reviewing and approving tags, as well as controlling who can post on their timeline. Mention the benefits of these features in maintaining privacy and preventing unwanted posts on their profile.
Securing Account Information:
Provide information on securing the account itself. Cover topics like setting a strong password, enabling two-factor authentication, and recognizing phishing attempts. Stress the importance of protecting the account against unauthorized access.
Blocking and Reporting:
Explain how users can block or report unwanted contacts or content. Discuss the steps for blocking users, reporting abusive content, and ensuring a safer online environment.
Summarize the key takeaways from the article, emphasizing the importance of taking control of Facebook’s privacy settings to protect personal information online. Encourage users to regularly review and update their privacy settings as needed.
Accessing Your Facebook Privacy Settings
- Log into Your Facebook Account:
- Open your web browser and navigate to the Facebook website (www.facebook.com).
- Enter your email address or phone number and your password.
- Click the “Log In” button to access your Facebook account.
- Navigate to Your Profile:
- Once logged in, you will land on your Facebook homepage, also known as the News Feed. Click on your profile picture or your name at the top right corner of the page. This action will take you to your Facebook profile.
- Access Account Settings:
- On your Facebook profile, locate the “Account” drop-down menu. It is typically represented by a small arrow or triangle pointing down, located in the top right corner of the page, near your name and profile picture.
- Click on the drop-down menu to reveal a list of options.
- Select “Settings & Privacy”:
- Within the “Account” drop-down menu, you will see several options. Locate and click on “Settings & Privacy.”
- Access “Privacy Shortcuts”:
- In the “Settings & Privacy” section, you’ll find “Privacy Shortcuts” near the top of the menu. Click on “Privacy Shortcuts” to proceed.
- Navigate to “Privacy Checkup”:
- In the “Privacy Shortcuts” section, you will find various options related to privacy. Locate and click on “Privacy Checkup.” This tool allows you to review and adjust your privacy settings.
- Start the Privacy Checkup:
- Clicking “Privacy Checkup” will start the process of reviewing your privacy settings. Facebook will guide you through various aspects of your account’s privacy, such as who can see your posts, who can contact you, and how your data is used.
- Review and Adjust Settings:
- Facebook will present you with different privacy settings for your posts, profile information, and more. Review each setting carefully and make adjustments based on your preferences.
- For each setting, you can typically choose from options like “Public,” “Friends,” or “Only Me.” Customize these settings to control who can see your content.
- Complete the Privacy Checkup:
- Follow the prompts provided by Facebook to complete the Privacy Checkup. This may involve reviewing who can see your future posts, reviewing and managing your profile information, and checking app privacy settings.
- Save Changes:
- After reviewing and adjusting your settings, be sure to save any changes you’ve made. Facebook will often provide a “Save” or “Done” button to confirm your settings.
By following these steps, you’ll have successfully accessed your Facebook privacy settings and initiated a Privacy Checkup. Regularly reviewing and customizing these settings is crucial for maintaining your online privacy and controlling who can access your personal information on the platform.
Setting Privacy for Your Posts
- Log into Your Facebook Account:Open your web browser, go to www.facebook.com, and log in with your email address or phone number and password.
- Create a New Post: Click on the “Create Post” box at the top of your Facebook homepage or profile. This is where you can compose a new post.
- Compose Your Post: Write your post content, add photos, videos, or links as desired. You can also tag friends or add location information if relevant.
- Set Privacy for the Post: Just below the post box, you’ll see a dropdown menu next to “Friends” or another privacy indicator. Click on this dropdown to access privacy options.
- Choose Your Audience: Facebook provides various audience options. Select the one that suits your needs:
- Public: Anyone on or off Facebook can see your post.
- Friends: Only your Facebook friends can see your post.
- Friends except…: You can exclude specific friends from seeing the post.
- Specific Friends: You can choose specific friends to see the post.
- Only Me: The post is visible only to you.
- Custom: Allows you to customize your audience by selecting specific friends or creating friend lists. You can also exclude certain people.
- Review Your Choice: Before posting, take a moment to review your privacy settings and ensure they match your intentions.
- Add Additional Privacy Settings (Optional): You can also click on “More Options” to access additional settings, such as allowing or disallowing comments, restricting who can react to your post, or setting an expiration date for the post.
- Post Your Content: Once you’re satisfied with your post and privacy settings, click the “Post” button to share it.
Changing Privacy Settings for Existing Posts:
- Access Your Profile:
- If you want to change the privacy settings of a post you’ve already shared, first navigate to your Facebook profile.
- Locate the Post:
- Scroll through your timeline or use the search bar to locate the specific post you want to edit.
- Edit the Post’s Privacy:
- Click on the post to open it. Then, click the three dots (ellipses) in the upper right corner of the post to access the post’s options.
- Choose “Edit Audience”:
- Select “Edit Audience” from the dropdown menu.
- Adjust the Audience:
- In the audience selector, choose a new privacy setting for the post. You can make it more private or more public, depending on your preferences.
- Save Changes:
- After making the desired changes, click “Save” to update the post’s privacy settings.
By following these steps, you can easily control the privacy of your Facebook posts, ensuring that your content is shared only with the audience you intend. It’s essential to regularly review and adjust these settings to maintain control over your online presence.
Setting Privacy for Your Posts – In-Depth Guide
- Log into Your Facebook Account:
- Start by opening your preferred web browser and navigating to www.facebook.com. Log in using your email address or phone number and your password.
- Creating a New Post:
- On your Facebook homepage or profile, you’ll see a text box labeled “Create Post” at the top. Click inside this box to start composing a new post.
- Composing Your Post:
- In the post text box, write your content. You can include text, links, photos, videos, or other media. Tag friends by typing “@” followed by their name to mention them in your post.
- Setting Privacy Options:
- Below the post text box, you’ll find a dropdown menu next to “Friends” (or another privacy indicator, depending on your previous choice). Click on this dropdown to access privacy options.
- Privacy Options Explained:
- Here’s a more detailed explanation of the available privacy settings:
- Public: This setting makes your post visible to anyone, whether they are on Facebook or not. Your post may appear in search results.
- Friends: Your post will be visible only to your Facebook friends.
- Friends except…: You can exclude specific friends from seeing your post by selecting this option.
- Specific Friends: Choose specific friends who can see the post while excluding others.
- Only Me: The post is completely private and visible only to you.
- Custom: Customize your audience by selecting specific friends or creating friend lists. You can also exclude specific people or lists.
- Here’s a more detailed explanation of the available privacy settings:
- Audience Selector Icon:
- Next to the privacy dropdown menu, you’ll see an icon that represents your selected audience. It’s essential to always check this icon to confirm your chosen privacy setting before posting.
- Additional Privacy Options:
- If you click on “More Options,” you’ll find additional settings that allow you to:
- Allow or disallow comments on your post.
- Choose who can react to your post (e.g., allow or disallow “likes” or “haha” reactions).
- Set an expiration date for the post, making it automatically unviewable after a certain time.
- If you click on “More Options,” you’ll find additional settings that allow you to:
- Posting Your Content:
- Once you’re satisfied with your post and its privacy settings, click the “Post” button to share it. Your post will now be visible to the audience you’ve selected.
Changing Privacy Settings for Existing Posts:
- Access Your Profile:
- To modify the privacy settings of a post you’ve already shared, go to your Facebook profile.
- Locate the Post:
- Scroll through your timeline or use the search bar to find the specific post you want to edit.
- Editing the Post’s Privacy:
- Click on the post to open it fully. Then, click the three dots (ellipses) in the upper right corner of the post to access additional options.
- Choose “Edit Audience”:
- From the dropdown menu, select “Edit Audience.”
- Adjust the Audience:
- In the audience selector, choose a new privacy setting for the post. You can make it more private or more public based on your preferences.
- Save Changes:
- After making the desired changes, click “Save” to update the post’s privacy settings.
By following these detailed steps and understanding the various privacy settings and options, you can effectively control who sees your Facebook posts, ensuring that your content is shared according to your preferences and privacy needs. Remember to regularly review and adjust these settings to maintain control over your online presence.