How to do hanging indent on word
In the world of word processing, Microsoft Word stands as one of the most widely used tools. Its extensive features and user-friendly interface make it a go-to choice for creating various documents, including research papers, reports, and academic essays. One formatting feature that often comes in handy, especially in academic and professional writing, is the hanging indent. In this article we will provide you with a detailed guide on how to do hanging indent on word. By the end of this essay, you’ll have a thorough understanding of what a hanging indent is and how to apply it to your documents effectively.
What is a Hanging Indent?
A hanging indent is a formatting style used primarily in documents that require lists or citations. It is a typographical format where the first line of a paragraph or entry starts at the left margin, but subsequent lines are indented. The purpose of a hanging indent is to make the document more readable and visually organized, particularly when dealing with lengthy lists, references, or bibliographies. It allows for quick identification of each item’s beginning, making it easier for readers to navigate through the content.A hanging indent is created when your first line in the paragraph starts at the left margin and the subsequent lines start indented, or spaced, from the second margin. This keeps the information aligned and makes it easier to read. They are also used for bulleted and numbered lists. Let’s take a look at how to create a hanging indent on Microsoft Word,A hanging indent, also called a second line indent, is a formatting option that emphasizes the first line of a paragraph by positioning it at the margin and then indenting each subsequent line of a paragraph. Many individuals, including students and professional writers, need to know how to add hanging indents to their work. For example, a college student might need to add a works cited page to an essay. Professional writers often use hanging indents to format text like bibliographies, reference pages and works cited pages. They’re also used in legal writing to create legal outlines and lists.
When Should You Use a Hanging Indent?
Writers most often use hanging indents for reference, bibliography or works cited pages. Often, professional and academic style guides require that writers include these pages with certain types of writing and also require that they use hanging indents in the reference page formatting. These reference pages are lists of citations that describe information about sources used in the writer’s work, including the name of the author, the publisher, the date of publishing and other details.
Hanging indents are commonly used in various types of documents:
- Bibliographies and References: When listing sources in academic papers, articles, or books, a hanging indent is used to format citations. This format distinguishes each entry clearly and ensures a neat and consistent appearance.
- Bullet and Numbered Lists: In documents where you want to present information in a structured list format, such as instructions, steps, or items, a hanging indent can help maintain readability and hierarchy.
- Table of Contents: In longer documents, a hanging indent is used to format the entries in a table of contents. This format aids readers in quickly locating sections or chapters.

How to do hanging indent on word?
By mastering these advanced tips and scenarios, you’ll be well-equipped to handle various formatting challenges in Microsoft Word, creating professional and polished documents that adhere to your desired style and standards. Hanging indents are a valuable tool in your document formatting arsenal, whether you’re writing research papers, reports, or other types of content.
Step-by-Step Guide
To create a hanging indent in Microsoft Word, follow these steps:
- Step 1: Open Your DocumentLaunch Microsoft Word and open the document where you want to apply the hanging indent.
- Step 2: Select the TextHighlight the text that you want to format with a hanging indent. This can be a list of references, a bibliography, or any other content that requires this formatting.
- Step 3: Access the Paragraph Dialog BoxTo access the Paragraph dialog box, you have a few options:
- Option 1: Right-click on the selected text and choose “Paragraph” from the context menu.
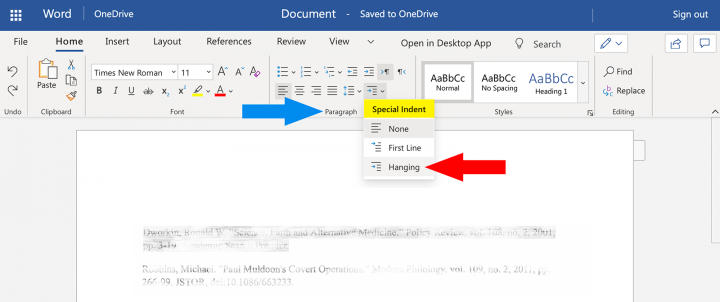
- Option 2: Click on the “Home” tab in the ribbon at the top of the screen. In the “Paragraph” group, click the small arrow in the bottom right corner.
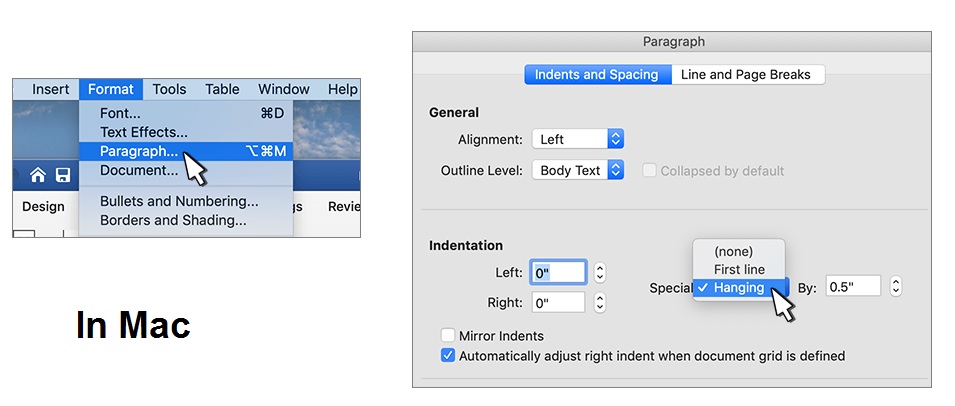
- Step 4: Set the Hanging IndentIn the Paragraph dialog box, locate the “Special” section under the “Indents and Spacing” tab. Click the drop-down menu next to “Special.”
- Step 5: Specify the Hanging Indent ValueChoose “Hanging” from the drop-down menu. This action will automatically set the “By” value to 0.5 inches by default. You can adjust this value if needed, but 0.5 inches is a standard hanging indent size.
- Step 6: Apply and ReviewAfter setting the hanging indent, click the “OK” button in the Paragraph dialog box. Your selected text will now have a hanging indent applied to it.
2.2. Customizing the Hanging Indent
It’s worth noting that you can customize the hanging indent to suit your document’s specific requirements. You can modify the following settings in the Paragraph dialog box:
- Left Indent: This determines how far the first line of your paragraph is indented from the left margin. You can adjust this if you want the hanging indent to start closer or farther from the margin.
- Hanging Indent: As mentioned earlier, this controls the indentation of the lines after the first line in your paragraph. You can change the measurement (e.g., 0.5 inches) based on your preferences.
- Special: Choose “Hanging” to create a hanging indent.
- By: This value specifies the amount of space (in inches or centimeters) for the hanging indent. Adjust this value as needed for your document’s formatting requirements.
By following these steps and customizing the settings in the Paragraph dialog box, you can create a hanging indent tailored to your document’s needs. In this comprehensive guide, we’ve explored the concept of a hanging indent, its significance in document formatting, and provided a detailed, step-by-step tutorial on how to create a hanging indent in Microsoft Word. Whether you’re working on academic papers, reports, or any document that requires organized lists or citations, mastering the hanging indent will enhance the readability and professionalism of your work. Armed with this knowledge, you can now confidently apply hanging indents to your documents, making them more polished and visually appealing.
2.3. Applying a Hanging Indent to Multiple Paragraphs
Sometimes, you might need to apply a hanging indent to multiple paragraphs at once, such as in a bibliography or a document with multiple lists. To do this:
- Step 1: Highlight all the paragraphs you want to format with a hanging indent.
- Step 2: Access the Paragraph dialog box as mentioned in the previous section.
- Step 3: Set the “Special” to “Hanging” and adjust the “By” value as needed.
- Step 4: Click “OK.”
This will apply the hanging indent to all selected paragraphs simultaneously, saving you time and ensuring consistency.
2.4. Removing a Hanging Indent
If you need to remove a hanging indent from a paragraph or a group of paragraphs:
- Highlight the text with the hanging indent.
- Access the Paragraph dialog box.
- Set the “Special” to “None.”
- Click “OK.”
This action will remove the hanging indent, and your text will return to the standard left-aligned formatting.
2.5. Keyboard Shortcut for Hanging Indent
For a quicker way to apply a hanging indent without accessing the Paragraph dialog box:
- Highlight the text you want to format.
- Press
Ctrl+T(for Windows) orCommand+T(for Mac).
This keyboard shortcut instantly applies a hanging indent with the default settings (0.5 inches) to the selected text.
3. Best Practices for Using Hanging Indents
To optimize the use of hanging indents in your documents:
- Consistency: Maintain a consistent hanging indent style throughout your document, especially in lists or bibliographies. Consistency enhances readability.
- Spacing: Ensure appropriate spacing between entries in your lists or citations. Consistent spacing contributes to a polished appearance.
- Proofreading: After applying hanging indents, proofread your document to catch any formatting errors or inconsistencies. Pay attention to indentation, alignment, and spacing.
- Citation Styles: If you are working on academic papers, be aware of different citation styles (e.g., APA, MLA, Chicago) and their specific hanging indent requirements. Adjust your hanging indents accordingly.
- Document Styles: Consider the overall style of your document. Hanging indents can be particularly useful in professional documents, academic papers, and reports, but may not be suitable for all types of content.
In this extended guide, we’ve delved into additional details regarding hanging indents in Microsoft Word. You’ve learned how to apply hanging indents to multiple paragraphs, remove them, use a keyboard shortcut for efficiency, and implement best practices to enhance your document formatting. By mastering the art of hanging indents, you’ll be able to create more organized, visually appealing documents that convey professionalism and clarity to your readers. Whether you’re a student, professional, or writer, these skills will prove valuable in various writing and publishing contexts.
4. Advanced Tips and Scenarios for Hanging Indents
4.1. Customizing Hanging Indents for Different Styles
Depending on your document’s requirements, you may need to customize hanging indents for various styles. For example, in an academic paper, your bibliography might require a different hanging indent style than your numbered list. You can create and save custom paragraph styles with specific hanging indent settings to easily apply consistent formatting throughout your document.
Here’s how to create a custom paragraph style:
- Format a paragraph with the desired hanging indent settings.
- Select the formatted paragraph.
- Go to the “Home” tab, right-click on the style gallery in the “Styles” group, and choose “Save Selection as a New Quick Style.”
- Give your custom style a name and save it.
- To apply the custom style to other paragraphs, select the text and click on your custom style in the “Styles” gallery.
4.2. Hanging Indents in Footnotes and Endnotes
In academic and research papers, you may encounter situations where you need to format hanging indents within footnotes or endnotes. To achieve this:
- Insert your footnote or endnote as usual.
- Highlight the text within the note that requires a hanging indent.
- Access the Paragraph dialog box (right-click > Paragraph or use the keyboard shortcut
Ctrl+Ton Windows orCommand+Ton Mac). - Set the “Special” to “Hanging” and adjust the “By” value.
- Click “OK” to apply the hanging indent to the footnote or endnote text.
This technique helps maintain consistent formatting even within footnotes or endnotes.
4.3. Troubleshooting Common Issues
Sometimes, you may encounter formatting challenges when working with hanging indents. Here are solutions to common issues:
- Inconsistent Indentation: If you notice uneven or inconsistent hanging indentations, check that the “Special” setting in the Paragraph dialog box is consistently set to “Hanging” for all paragraphs.
- Spacing Issues: To control the spacing between hanging indents, adjust the “Before” and “After” spacing settings in the Paragraph dialog box. Ensure they are consistent for all paragraphs.
- Custom Tab Stops: If you have custom tab stops set in your document, they might interfere with hanging indents. Clear any unnecessary custom tab stops to ensure the hanging indent aligns correctly.
4.4. Using Hanging Indents with Tables
While hanging indents are typically used in paragraphs, you can also apply them to text within table cells. This can be useful when creating tables with lists or references. To do this:
- Insert a table into your document.
- Within a table cell, type or paste the text that requires a hanging indent.
- Highlight the text in the cell.
- Access the Paragraph dialog box.
- Set the “Special” to “Hanging” and adjust the “By” value.
- Click “OK” to apply the hanging indent within the table cell.
This technique can enhance the readability of tables containing textual data.
In this advanced section, we’ve covered how to customize hanging indents for different styles, apply them within footnotes and endnotes, troubleshoot common issues, and even use hanging indents within table cells.