
how to create a dropdown in excel
When working with Excel, data accuracy and efficiency are paramount. This feature allows you to select predefined options from a list, eliminating the risk of errors and speeding up data entry. One powerful tool to enhance both is the dropdown list.In this step-by-step guide, we’ll show you how to create a dropdown in excel effortlessly.
What is excel?
Microsoft Excel is a spreadsheet editor developed by Microsoft for Windows, macOS, Android, iOS and iPadOS. It features calculation or computation capabilities, graphing tools, pivot tables, and a macro programming language called Visual Basic for Applications. Excel forms part of the Microsoft 365 suite of software .Microsoft Excel is a program in the Office 365 suite typically used to store, sort, and manipulate data. Although Excel is not a database, it is often used in data analytics and finance careers to assess large amounts of information and create visualizations.
How to create a dropdown in excel
Excel is a spreadsheet program from Microsoft and a component of its Office product group for business applications. Microsoft Excel enables users to format, organize and calculate data in a spreadsheet. These follows are the steps to create dropdown in microsoft excel.
Step 1: Open Your Excel Workbook:
Launch Microsoft Excel and open the workbook where you want to create the dropdown list.
Step 2: Prepare Your List:
Before creating the dropdown, you need to have a list of items you want to include in the dropdown menu. This list can be in the same worksheet or another location in your workbook.
Step 3: Select the Cell(s) for the Dropdown:
Click on the cell where you want to create the dropdown list. This is where the dropdown arrow will appear.
Step 4: Open the Data Validation Dialog Box:
- Go to the “Data” tab in the Excel ribbon.
- Click on “Data Validation” in the “Data Tools” group.
Step 5: Configure Data Validation:
In the “Data Validation” dialog box:
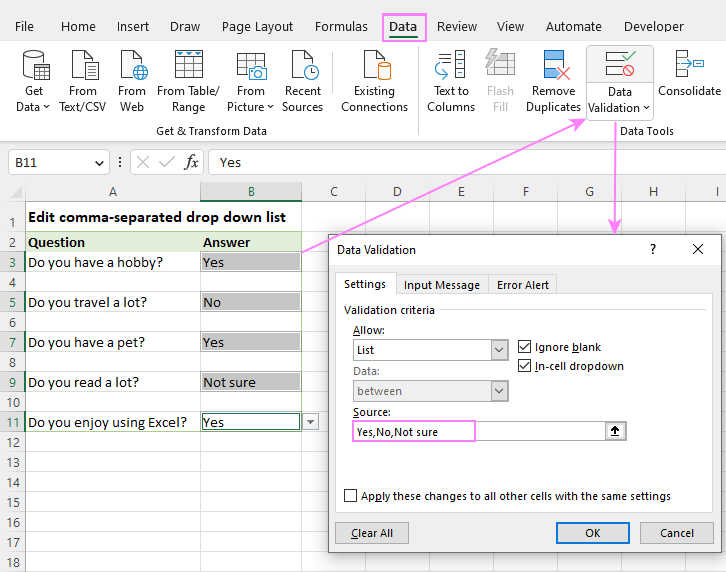
- In the “Settings” tab, under “Allow,” choose “List.”
- In the “Source” field, either type in the list items separated by commas (e.g., “Option 1, Option 2, Option 3”) or click the small icon at the end of the field and select the cells containing your list.
Step 6: Customize the Dropdown Settings (Optional):
- In the “Data Validation” dialog box, you can go to the “Error Alert” tab to customize the message users see if they enter data that doesn’t match the dropdown list.
- You can also go to the “Input Message” tab to add an optional message that appears when the cell is selected.
Step 7: Test Your Dropdown List:
Now, when you click on the cell you selected earlier, you’ll see a dropdown arrow. Click on it to see and select from the items in your list.
Step 8: Expanding the Dropdown (Optional):
If you want to apply the same dropdown list to multiple cells, you can copy the cell with the dropdown list and paste it into other cells.
Step 9: Editing the Dropdown List:
To edit the items in your dropdown list, you can go back to the cell with the list source and modify it. The changes will automatically apply to all cells with the dropdown.
Step 10: Data Entry with Dropdowns:
Now, users can efficiently enter data by selecting from the predefined options in the dropdown list, reducing errors and ensuring consistency.
Creating dropdown lists in Excel is a straightforward yet powerful way to improve data accuracy and streamline data entry. Whether you’re managing inventory, conducting surveys, or organizing information, dropdown lists empower you to work efficiently and maintain data integrity.
By following these steps, you can easily create and customize dropdown lists in Excel, ensuring that your data remains organized and error-free.
1. Dropdown List with Multiple Selections:
By default, Excel’s data validation dropdowns allow users to select only one item from the list. If you need to allow multiple selections, you may need to use a different method, such as checkboxes or custom VBA (Visual Basic for Applications) coding.
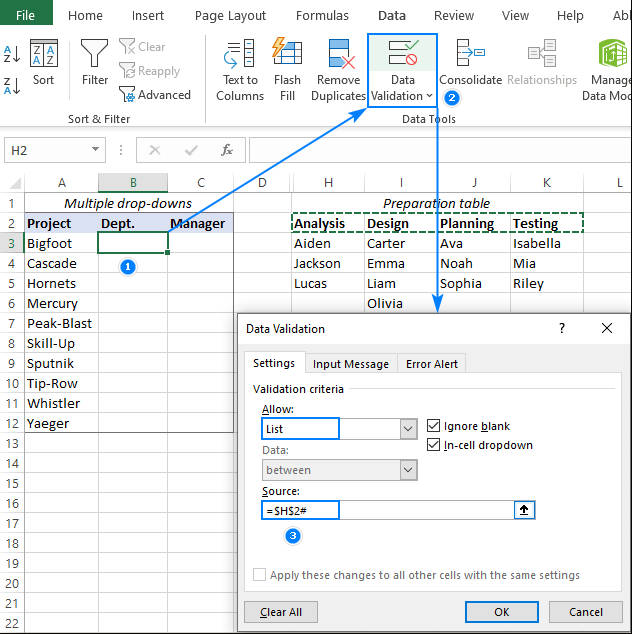
2. Dynamic Dropdown Lists:
You can create dynamic dropdown lists that change based on the selection in another cell. This is often done using Excel’s “Named Ranges” and “INDIRECT” function. It’s useful when you have a cascading dropdown where the options in one dropdown depend on the selection in another.
3. Dropdown Lists for Dates:
Creating dropdown lists for dates can be a bit tricky because there are many possible dates. One approach is to create a list of valid date options elsewhere in your workbook and use that as your source for the dropdown.
4. Data Validation Using Formulas:
Instead of manually typing the list items, you can use Excel formulas to generate the list dynamically based on certain criteria or data in your worksheet. This is particularly useful for creating conditional dropdown lists.
5. Protecting Dropdown Cells:
To prevent users from editing or deleting the dropdown list, you can protect the worksheet. Go to the “Review” tab and click on “Protect Sheet.” Then, select the options you want to allow users (e.g., selecting unlocked cells) and set a password if needed. Here we already discussed about how to make pie chart.
6. Clearing or Resetting Dropdowns:
You can create a “Clear” or “Reset” button that allows users to clear the selection in a dropdown cell. This can be helpful in data entry forms or templates.
7. Dropdowns in Excel Online:
If you’re using Excel Online (the web version of Excel), you can still create and use dropdown lists. The process is similar to the desktop version, but some advanced features may not be available.
8. Dropdown Lists in Excel for Mac:
Creating dropdown lists on Excel for Mac follows a similar process to the Windows version. However, there may be minor differences in the user interface and specific options.
9. Accessibility Considerations:
When creating dropdown lists, consider accessibility. Ensure that users with disabilities can easily navigate and use the dropdowns. Test your worksheet with screen readers and keyboard navigation to confirm accessibility.
10. Data Validation Error Messages:
Take advantage of the error message feature in Excel’s data validation. Customize the error messages to provide clear instructions to users when they enter data outside the dropdown options.
By mastering the art of creating dropdown lists in Excel and exploring advanced techniques, you can effectively manage and organize your data, whether it’s for personal finance, project tracking, or complex data entry forms. Dropdowns are versatile tools that enhance data integrity and user experience in Excel.
Procedure to create a dropdown in microsoft excel
Microsoft Excel is a versatile tool that allows you to manage and manipulate data effectively. One useful feature is the ability to create dropdown lists, which can streamline data entry, reduce errors, and enhance the user-friendliness of your spreadsheets. In this article, we’ll walk you through the step-by-step process of creating dropdown lists in Microsoft Excel.
Step 1: Open Your Excel Workbook
- Launch Microsoft Excel and open the workbook where you want to create the dropdown list.
Step 2: Select a Cell
- Click on the cell where you want to add the dropdown list. This is where users will select options from the list.
Step 3: Go to Data Validation
- Navigate to the “Data” tab in the Excel ribbon at the top.
- In the “Data Tools” group, click on “Data Validation.”
Step 4: Choose Data Validation
- In the “Data Validation” dialog box that appears, go to the “Settings” tab.
Step 5: Define the Dropdown List
- In the “Allow” dropdown menu, select “List.” This tells Excel that you want to create a list of allowable entries.
- In the “Source” field, you can either type in the list of items you want in the dropdown (e.g., “Option 1, Option 2, Option 3”) or select a range of cells in your spreadsheet that contains the list.
Step 6: Input Message (Optional)
- If you want to provide a prompt or instructions when the cell is selected, go to the “Input Message” tab.
- Check the “Show input message when cell is selected” box.
- Enter a title and an input message.
Step 7: Error Alert (Optional)
- If you want to display an error message when someone enters a value not in the dropdown list, go to the “Error Alert” tab.
- Check the “Show error alert after invalid data is entered” box.
- Choose the type of alert (Stop, Warning, or Information).
- Enter a title and error message.
Step 8: Test the Dropdown List
- Click “OK” to close the “Data Validation” dialog box.
- Now, when you click on the cell you selected earlier, you should see a small dropdown arrow.
- Click the arrow to open the dropdown list and select an option from it.
Step 9: Populate More Cells (Optional)
- If you want to use the same dropdown list in multiple cells, simply copy the cell with the dropdown list (Ctrl+C) and paste it (Ctrl+V) into other cells.
Step 10: Editing the Dropdown List
- To edit the dropdown list options, go back to the cell with data validation.
- Click on the cell and then click the dropdown arrow.
- Select “Data Validation” to access the settings and modify the list in the “Source” field.
Creating dropdown lists in Microsoft Excel can significantly improve data accuracy and efficiency. Whether you’re building a data entry form or simplifying data selection, this feature helps ensure that only valid choices are made. By following these steps, you can easily incorporate dropdown lists into your Excel workbooks, making your data management tasks smoother and more user-friendly.
Excel’s data validation tool is a valuable asset, allowing you to customize your spreadsheets for better organization and accuracy.
Procedure to create a dropdown in microsoft excel in mobile app
Step 1: Open Your Excel Workbook
- Launch the Microsoft Excel mobile app on your mobile device.
- Open the workbook where you want to create the dropdown list.
Step 2: Select a Cell
- Tap on the cell where you want to add the dropdown list. This is the cell where users will choose options from the dropdown.
Step 3: Access Data Validation
- Tap the selected cell to activate it.
- In the lower menu, tap the “Data” icon (represented by a table).
Step 4: Define the Dropdown List
- Tap “Data Validation” from the menu options.
- In the “Allow” field, select “List” to indicate that you want to create a list of allowable entries.
- In the “Source” field, you can manually type in the list of items for your dropdown, separated by commas (e.g., “Option 1, Option 2, Option 3”), or you can select a range of cells within your spreadsheet that contains the list.
Step 5: Test the Dropdown List
- Once you’ve defined the list, tap “Done” or the equivalent option on your mobile device’s keyboard to confirm your selection.
- Now, when you tap the cell you selected earlier, you should see a small dropdown arrow next to it.
- Tap the arrow to open the dropdown list and select an option from it.
Step 6: Edit the Dropdown List (Optional)
- To modify the dropdown list options, go back to the cell with data validation.
- Tap the cell, and then tap the dropdown arrow.
- Tap “Data Validation” to access the settings and make changes to the list in the “Source” field.
Creating dropdown lists in the Microsoft Excel mobile app provides a valuable tool for efficient data entry and improved user experience when working on spreadsheets from your mobile device. This feature ensures that only valid choices are made, reducing errors and enhancing the accuracy of your mobile data tasks.
With these straightforward steps, you can easily incorporate dropdown lists into your Excel spreadsheets on your mobile device, making data management on the go a more seamless and organized process.
Excel’s mobile app offers essential features that empower you to work with your data wherever you are, ensuring you stay productive even when you’re away from your desktop computer.