How to create email account in mobile
In today’s digital age, having an email account is essential for communication, whether it’s for work or personal use. Fortunately, setting up an email account on your mobile device is a straightforward process. In this step-by-step guide, we will walk you through the how to create email account in mobile on both Android and iOS devices.
Creating an Email Account on Android
Step 1: Open the Email App
- Unlock your Android device and navigate to the home screen.
- Locate and open the “Email” app. If you can’t find it, you can also use the Gmail app, which is compatible with most email providers.
Step 2: Add an Account
- In the Email app, tap on the three horizontal lines (usually found in the top-left corner) to access the menu.
- Select “Settings” from the menu.
- Tap on “Add account.”
- Choose the type of email account you want to create. Options include Google, Outlook, Yahoo, and more.
- Follow the on-screen instructions to enter your email address and password.
- After entering your credentials, tap “Sign In” or “Next.”
Step 3: Account Setup
- Depending on your email provider, you may need to adjust some settings like sync frequency and notification preferences. Follow the prompts to customize your email account settings.
- Once you’re satisfied with the settings, tap “Next.”
- You may be prompted to give the app permissions to access your email. Allow these permissions to complete the setup.
Step 4: Confirmation
- Your email account is now set up on your Android device. You can access your emails by opening the Email app or the Gmail app.
Creating an Email Account on iOS
Step 1: Open the Settings App
- Unlock your iOS device and go to the home screen.
- Locate and open the “Settings” app, which is represented by a gear icon.
Step 2: Add an Account
- Scroll down and select “Mail.”
- Tap “Accounts.”
- Select “Add Account.”
- Choose your email provider (e.g., Google, Outlook, Yahoo).
- Enter your email address and password.
- Tap “Next” or “Sign In.”
Step 3: Account Setup
- Customize your email account settings, such as email syncing preferences and notification options.
- Once you’re satisfied with the settings, tap “Save” or “Next.”
Step 4: Confirmation
- Your email account is now set up on your iOS device. You can access your emails by opening the “Mail” app.
Setting up an email account on your mobile device is a simple process, whether you’re using an Android or iOS device. Follow the steps outlined above, and you’ll have your email account ready for use in no time. Stay connected and enjoy the convenience of accessing your emails on the go!
Remember to secure your email account with a strong password and enable two-factor authentication for added security.
how to create email account in android mobile
In our digital age, email communication is a fundamental part of our daily lives. Setting up an email account on your Android mobile device is a straightforward process that allows you to stay connected while on the go. In this guide, we’ll walk you through the steps to create an email account on your Android phone or tablet.
Step 1: Open Your Email App
- Unlock your Android device and go to the home screen.
- Locate and open the “Email” app. If you can’t find it, you can also use the Gmail app, which is compatible with most email providers.
Step 2: Add a New Email Account
- Once you’re in the Email app, tap the menu icon (usually three horizontal lines) in the top-left corner.
- Select “Settings” from the menu options.
- Tap on “Add account.”
- You’ll be prompted to choose the type of email account you want to create. Options include Google, Outlook, Yahoo, and others. Select your email provider.
Step 3: Enter Your Email and Password
- Enter your email address in the provided field.
- Then, type in your email account’s password.
- Tap “Next” or “Sign In” to proceed.
Step 4: Account Setup and Customization
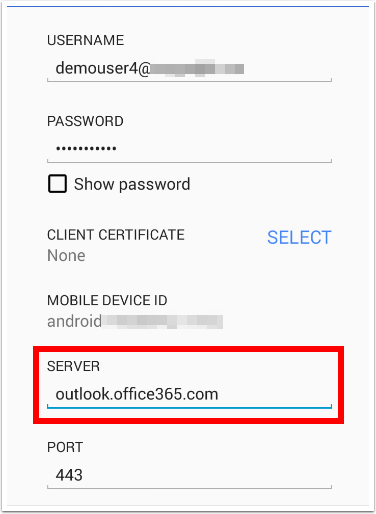
- Depending on your email provider, you may need to configure additional settings such as sync frequency, server information, and notification preferences. Follow the on-screen instructions to customize these settings as per your preference.
- After customizing your account settings, tap “Next” to continue.
Step 5: Permissions and Account Confirmation
- You may receive a prompt to grant the app permissions to access your email account. Allow these permissions for a seamless email experience.
- Congratulations, your email account is now successfully set up on your Android device! You can access your emails by opening the Email app or the Gmail app.
Creating an email account on your Android mobile device is a quick and hassle-free process. By following these easy steps, you’ll have your email account configured and ready to use in no time. Stay connected, manage your emails efficiently, and enjoy the convenience of accessing your messages wherever you are.
To enhance your email security, consider using a strong and unique password, and explore additional security features provided by your email service provider.
how to create email account in ios mobile
Email communication is an integral part of our daily lives, and setting up an email account on your iOS mobile device is a breeze. In this guide, we’ll walk you through the process of creating an email account on your iPhone or iPad, ensuring that you can stay connected no matter where you are.
Step 1: Access the Settings App
- Unlock your iOS device and find the “Settings” app on your home screen, represented by a gear icon.
Step 2: Add a New Email Account
- Scroll down in the Settings menu and tap on “Mail” or “Mail, Contacts, Calendars,” depending on your iOS version.
- Under the “Accounts” section, select “Add Account.”
Step 3: Choose Your Email Provider
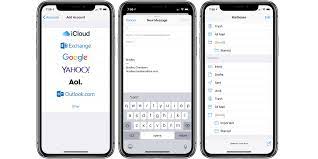
- You will be presented with a list of email service providers. Choose the one that corresponds to your email address, such as Google, Outlook, Yahoo, or others. If your provider isn’t listed, you can select “Other” to manually set up your account.
- Enter your email address and password.
Step 4: Account Verification
- iOS will verify your account. If you’re using a popular email service like Gmail, your settings will be automatically configured. For other providers, you may need to input server information, which can usually be obtained from your email service provider.
- Follow any on-screen instructions to complete the setup. This may include configuring additional settings like syncing, notifications, and signature preferences.
Step 5: Permissions and Finalization
- You may receive prompts requesting permission for the email app to access certain features of your device. Allow these permissions to ensure smooth email functionality.
- Congratulations! Your email account is now successfully configured on your iOS mobile device. You can access your emails by opening the “Mail” app.
Creating an email account on your iOS mobile device is a straightforward process. By following these simple steps, you can have your email account set up and ready to use in a matter of minutes. Stay connected, manage your emails efficiently, and enjoy the convenience of accessing your messages on the go.
To enhance the security of your email account, consider using a strong and unique password, and explore additional security features provided by your email service provider.
How to create email account in outlook for mobile
Microsoft Outlook is a widely used email client, and having it on your mobile device can help you stay organized and connected. In this step-by-step guide, we’ll walk you through the process of creating an Outlook email account on your mobile device, ensuring you can access your emails while on the go.
Step 1: Install the Outlook App
- Open your device’s app store (Google Play Store for Android or Apple App Store for iOS).
- In the search bar, type “Outlook” and select the official Microsoft Outlook app.
- Download and install the app on your mobile device.
Step 2: Launch the Outlook App
- Locate the Outlook app icon on your home screen and tap to open it.
Step 3: Add a New Account
- On the welcome screen, tap “Get Started.”
- If you already have an Outlook account, you can sign in with your credentials. To create a new account, tap “Create account.”
Step 4: Enter Your Email Address
- Type in your email address (e.g., example@email.com) and tap “Continue.”
Step 5: Create a Password
- Create a strong password for your Outlook account. It should be a combination of letters, numbers, and symbols.
- Confirm the password by entering it again.
- Tap “Next” to proceed.
Step 6: Personalize Your Account
- Enter your first and last name.
- Tap “Next” to continue.
Step 7: Set Up Your Account
- Outlook will try to automatically configure your email settings based on your email address. If it succeeds, proceed to the next step. If not, you may need to enter server and account details manually.
- Review and customize additional settings such as notification preferences, sync frequency, and security options.
- Tap “Done” or “Finish” to finalize the setup.
Step 8: Access Your Outlook Account
- Your Outlook email account is now successfully set up on your mobile device. You can access your emails, contacts, and calendar by opening the Outlook app.
Setting up an Outlook email account on your mobile device is a simple process that enhances your email accessibility and productivity. By following these steps, you’ll have your Outlook account configured and ready to use in no time. Stay connected, manage your emails efficiently, and enjoy the convenience of accessing your messages wherever you are.
For added security, consider enabling two-factor authentication (2FA) for your Outlook account and regularly updating your password.
Step 9: Managing Your Outlook Account
- Once your Outlook email account is set up, you can start managing your emails, contacts, and calendar events right from the app’s dashboard.
- You can compose new emails, reply to messages, and organize your inbox with folders and categories.
- To access your contacts, tap on the “Contacts” icon within the app to view and add new contacts.
- The calendar feature allows you to schedule appointments, meetings, and events. Tap the “Calendar” icon to get started.
Step 10: Additional Features
- Explore additional features within the Outlook app, such as file attachments, integration with cloud storage services like OneDrive, and the ability to link other email accounts from various providers for a unified inbox.
- Customize your notifications to stay updated on incoming emails and events.
- Consider setting up your email signature, so your outgoing messages have a professional touch.
Step 11: Stay Secure
- Outlook takes your email security seriously. It’s advisable to periodically review and update your password.
- Enable two-factor authentication (2FA) for an extra layer of security. This will require you to enter a temporary code sent to your mobile device when signing in.
By following these straightforward steps, you’ve successfully set up your Outlook email account on your mobile device. Now, you can enjoy seamless access to your emails, contacts, and calendar while on the move. Microsoft Outlook offers a powerful and user-friendly email experience, making it a valuable tool for both personal and professional communication.
Remember to regularly check for app updates to ensure you have access to the latest features and security enhancements. With your Outlook account configured on your mobile device, you’re ready to stay organized, efficient, and connected wherever you go.
This continuation provides information on managing your Outlook email account, exploring additional features, and emphasizing the importance of security. It aims to give users a comprehensive understanding of Outlook’s capabilities on their mobile devices. Customize it as needed to suit your audience’s specific needs or preferences.