how to make a bookmark
In the digital age, bookmarks serve as the unsung heroes of our online journeys, quietly enhancing our web browsing experience. But what exactly is a bookmark, and why is it so important? In this article, we’ll delve into the world of bookmarks, exploring their definition, purpose,how to make a bookmark and the numerous ways they enrich our online lives.
In a digital landscape overflowing with information and possibilities, bookmarks stand as the navigational compass that guides us through the virtual terrain. They offer convenience, organization, and personalization in an online world that can otherwise feel overwhelming. Bookmarks are not just digital shortcuts; they are gateways to efficiency, productivity, and tailored web experiences.
What Is a Bookmark?
A bookmark, in the context of web browsing, is a digital marker that allows users to save the web addresses (URLs) of specific webpages. These saved URLs are stored within the browser for easy access at a later time. Bookmarks essentially function as shortcuts to your favorite or frequently visited websites.
The Significance of Bookmarks:
- Effortless Access: The primary purpose of bookmarks is to provide users with quick and effortless access to websites they value. Instead of typing in a lengthy URL or relying on search engines, a simple click on a bookmark takes you directly to the desired webpage. This time-saving feature is particularly crucial for frequently visited websites, such as email services, news sources, or work-related platforms.
- Organization: Bookmarks are indispensable tools for organizing your online life. You can categorize bookmarks into folders and subfolders, creating a well-structured library of your preferred web destinations. This organization ensures that you can locate specific websites promptly, even if you have an extensive list of bookmarks.
- Enhanced Productivity: For individuals who conduct research or work online, bookmarks are essential for productivity. By bookmarking reference materials, research sources, or project-related webpages, you can seamlessly switch between resources, optimizing your workflow.
- Personalization: Bookmarks allow you to personalize your web experience. You can curate a collection of bookmarks that cater to your hobbies, interests, or professional needs. Whether it’s a collection of cooking blogs, educational websites, or industry news sources, your bookmarks reflect your online identity.
- Preservation of Favorites: As websites evolve or disappear over time, bookmarks serve as a means to preserve your favorite online destinations. You can revisit cherished articles, blog posts, or web tools long after they’ve been published.
- Cross-Device Synchronization: Many modern browsers offer synchronization features that allow you to access your bookmarks across multiple devices. This ensures a seamless transition between your desktop, laptop, tablet, and smartphone, maintaining your preferred web ecosystem wherever you go.
- Privacy and Security: By using bookmarks, you reduce the need to perform frequent web searches or type URLs repeatedly. This can enhance your online privacy and security by minimizing your exposure to potentially malicious websites or trackers.
So, embrace the power of bookmarks, curate your online library, and witness the transformation of your web browsing journey. With bookmarks by your side, you’ll navigate the internet with ease and unlock new levels of productivity and personalization.
how to make a bookmark in chrome
As we navigate the vast landscape of the internet, bookmarks emerge as our trusted guides, helping us revisit our favorite websites or essential resources with ease. Google Chrome, one of the most popular web browsers, offers a seamless way to organize and manage your bookmarks. In this step-by-step guide, we’ll walk you through how to create bookmarks in Chrome, ensuring you never lose track of your online treasures again.
Step 1: Open Google Chrome:
Launch the Google Chrome browser on your computer. Ensure that you are running the latest version for the best experience.
Step 2: Navigate to the Desired Webpage:
Go to the webpage you want to bookmark. This could be a frequently visited site, a useful article, or any web content you’d like to access quickly in the future.
Step 3: Create the Bookmark:
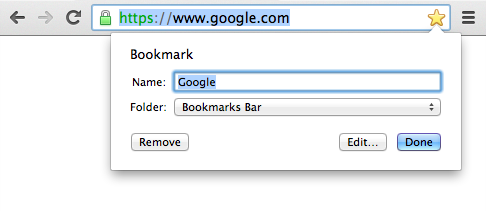
- Option 1: Using the Address Bar: Click on the address bar at the top of the Chrome window. You will see the website’s URL highlighted. Click and drag this URL to the bookmarks bar just below the address bar. Release the mouse button to create a bookmark. You can also press “Ctrl” + “D” (or “Cmd” + “D” on Mac) to open the “Add bookmark” window. Choose the folder where you want to save the bookmark, name it, and click “Save.”
- Option 2: Using the Bookmark Icon: Look for the star icon on the right side of the address bar. Clicking this icon will instantly bookmark the page you’re on. You can choose to save the bookmark to the bookmarks bar or other folders by selecting the destination from the drop-down menu that appears.
Step 4: Organize Your Bookmarks (Optional):
- To manage and organize your bookmarks, click on the three vertical dots (the menu icon) in the top-right corner of Chrome.
- Hover over “Bookmarks” in the dropdown menu, and you’ll find options to access your bookmarks, create new folders, and organize your bookmarks as you see fit.
Step 5: Access Your Bookmarks:
- To access your bookmarks quickly, you can click on the bookmarks bar, where you’ve saved your frequently visited sites.
- Alternatively, you can click the three vertical dots in the top-right corner of Chrome, go to “Bookmarks,” and select “Show bookmarks bar” to make the bookmarks bar permanently visible.
Step 6: Edit or Delete Bookmarks (Optional):
- If you want to edit or delete a bookmark, right-click on the bookmark in the bookmarks bar or open the bookmarks menu. From there, you can choose to edit the bookmark’s name or URL or delete it entirely.
Step 7: Sync Bookmarks (Optional):
- If you use Chrome across multiple devices, you can enable bookmark synchronization. Click the three vertical dots, go to “Settings,” and under “Sync and Google services,” make sure “Bookmarks” is turned on. This way, your bookmarks will be accessible on all your devices.
Conclusion:
Creating bookmarks in Google Chrome is a straightforward process that can significantly enhance your web browsing experience. With your favorite websites just a click away, you can stay organized and efficiently access the online resources that matter most to you. Whether it’s for work, research, or leisure, mastering the art of bookmarking in Chrome ensures that you’re always in control of your online journey.
So, start bookmarking your favorite websites today and watch as your web browsing becomes more organized and efficient than ever before.
how to make a bookmark in firefox
In the vast expanse of the internet, bookmarks serve as your trusty guides, allowing you to revisit your favorite websites and essential resources effortlessly. Mozilla Firefox, a popular web browser known for its user-friendly features, offers a seamless way to organize and manage your bookmarks. In this step-by-step guide, we’ll walk you through how to create bookmarks in Firefox, ensuring you can easily access your online treasures whenever you need them.
Step 1: Open Mozilla Firefox:
Launch the Mozilla Firefox browser on your computer. Make sure you’re using the latest version of Firefox to ensure you have access to the latest features and improvements.
Step 2: Navigate to the Desired Webpage:
Go to the webpage you want to bookmark. This could be a frequently visited site, a useful article, or any web content you’d like to access quickly in the future.
Step 3: Create the Bookmark:
- Option 1: Using the Address Bar: Click on the address bar at the top of the Firefox window. You will see the website’s URL highlighted. Click and drag this URL to the bookmarks toolbar, typically located just below the address bar. Release the mouse button to create a bookmark. You can also press “Ctrl” + “D” (or “Cmd” + “D” on Mac) to open the “Add Bookmark” window. Choose the folder where you want to save the bookmark, name it, and click “Save.”
- Option 2: Using the Star Icon: Look for the star icon on the right side of the address bar. Clicking this star icon will instantly bookmark the page you’re on. You can choose to save the bookmark to the bookmarks toolbar or other folders by selecting the destination from the dropdown menu that appears.
Step 4: Organize Your Bookmarks (Optional):
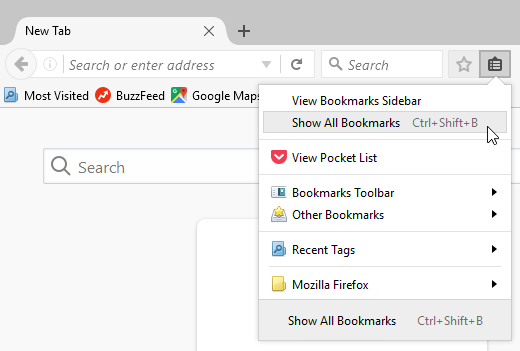
- To manage and organize your bookmarks, click on the three horizontal lines (the menu icon) in the top-right corner of Firefox.
- Hover over “Bookmarks” in the dropdown menu, and you’ll find options to access your bookmarks, create new folders, and organize your bookmarks as you see fit.
Step 5: Access Your Bookmarks:
- To access your bookmarks quickly, you can click on the bookmarks toolbar, where you’ve saved your frequently visited sites.
- Alternatively, you can click the three horizontal lines in the top-right corner of Firefox, go to “Bookmarks,” and select “Show bookmarks toolbar” to make the bookmarks toolbar permanently visible.
Step 6: Edit or Delete Bookmarks (Optional):
- If you want to edit or delete a bookmark, right-click on the bookmark in the bookmarks toolbar or open the bookmarks menu. From there, you can choose to edit the bookmark’s name or URL or delete it entirely.
Step 7: Sync Bookmarks (Optional):
- If you use Firefox across multiple devices, you can enable bookmark synchronization. Click the three horizontal lines, go to “Options,” select “Privacy & Security,” and scroll down to the “Firefox Data Collection and Use” section. Here, you can enable bookmark synchronization by checking the box labeled “Bookmarks.”
Creating bookmarks in Mozilla Firefox is a straightforward process that can significantly enhance your web browsing experience. With your favorite websites just a click away, you can stay organized and efficiently access the online resources that matter most to you. Whether it’s for work, research, or leisure, mastering the art of bookmarking in Firefox ensures that you’re always in control of your online journey.
So, start bookmarking your favorite websites today, and watch as your web browsing becomes more organized and efficient than ever before.
how to make a bookmark in safari
As we journey through the vast landscape of the internet, bookmarks become our trusted companions, guiding us back to our favorite websites and essential resources with ease. Apple’s Safari web browser, known for its sleek design and user-friendly features, offers a seamless way to organize and manage your bookmarks. In this step-by-step guide, we’ll walk you through how to create bookmarks in Safari, ensuring you can quickly access your online treasures whenever you need them.
Step 1: Open Safari:
Launch the Safari web browser on your Mac or iOS device. Ensure that you are using the latest version of Safari for the best browsing experience.
Step 2: Navigate to the Desired Webpage:
Go to the webpage you want to bookmark. This could be a frequently visited site, an informative article, or any web content you’d like to revisit effortlessly in the future.
Step 3: Create the Bookmark:
- Option 1: Using the Address Bar: Click on the address bar at the top of the Safari window. You will see the website’s URL highlighted. Click and drag this URL to the bookmarks bar, usually located just below the address bar. Release the mouse button to create a bookmark. Alternatively, you can press “Cmd” + “D” (or “Ctrl” + “D” on iOS) to open the “Add Bookmark” window. Choose the folder where you want to save the bookmark, provide a name for it, and click “Add.”
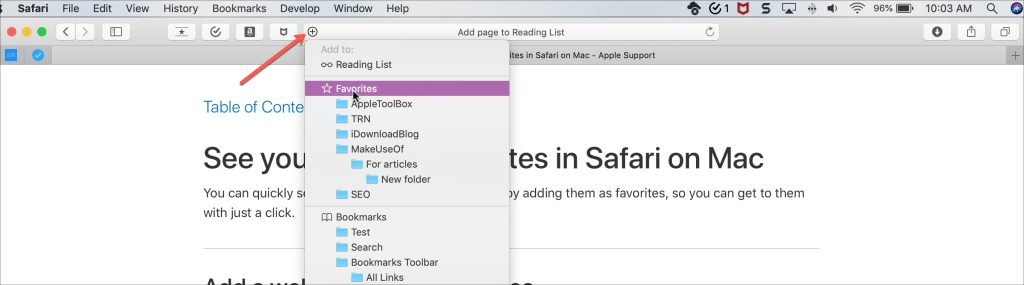
- Option 2: Using the Share Icon: Look for the share icon (a square with an arrow pointing upward) on the Safari toolbar. Click this icon, and from the dropdown menu, select “Add Bookmark.” You can then choose the folder in which to save the bookmark, customize the name, and select “Save.”
Step 4: Organize Your Bookmarks (Optional):
- To manage and organize your bookmarks, click on the “Bookmarks” menu in the Safari toolbar.
- From there, you can access your bookmarks, create new folders, and arrange your bookmarks in a way that suits your preferences.
Step 5: Access Your Bookmarks:
- To access your bookmarks quickly, you can click on the bookmarks bar, where you’ve saved your frequently visited sites.
- Alternatively, click “Bookmarks” in the Safari toolbar to access your full bookmark library.
Step 6: Edit or Delete Bookmarks (Optional):
- If you wish to edit or delete a bookmark, right-click (or tap and hold on iOS) on the bookmark in the bookmarks bar or the bookmarks library. You can then choose to edit the bookmark’s name or URL or delete it entirely.
Step 7: Sync Bookmarks (Optional):
- If you use Safari across multiple Apple devices (e.g., Mac, iPhone, iPad), you can enable bookmark synchronization. Open the “Settings” app on your iOS device, scroll down to “Safari,” and ensure that “Favorites” is toggled on. This will sync your bookmarks across all your Apple devices using iCloud.
Creating bookmarks in the Safari web browser is a straightforward process that can significantly enhance your web browsing experience. With your favorite websites just a click away, you can stay organized and efficiently access the online resources that matter most to you. Whether it’s for work, research, or leisure, mastering the art of bookmarking in Safari ensures that you’re always in control of your online journey.
So, start bookmarking your favorite websites today, and enjoy the convenience and efficiency that Safari’s bookmarking feature brings to your web browsing experience.