
How to create google form
Creating a Google Form is a straightforward process that allows you to gather valuable information and feedback efficiently. Whether you’re conducting market research, organizing events, or running quizzes, Google Forms offers a user-friendly platform to streamline data collection and analysis. By following this step-by-step guide, you can create custom forms tailored to your specific needs with ease.This post is all about how to create google form and to check its response.
What is google form?
Google Forms is a survey administration software included as part of the free, web-based Google Docs Editors suite offered by Google. The service also includes Google Docs, Google Sheets, Google Slides, Google Drawings, Google Sites, and Google Keep. Google Forms is only available as a web application.
Google form help tthe business to Manage event registrations, create a quick opinion poll, create quizzes, and much more. With Google Forms, you can create surveys or quizzes right in your mobile or web browser—no special software required. You get instant results as they come in. And, you can summarize results at a glance with charts and graphs.
The Scopes of using google forms
1. Response Validation:
Google Forms allows you to set response validation rules for questions. This ensures that respondents provide valid and accurate answers. For example, you can require email addresses to follow a specific format or specify a numerical range for certain questions.
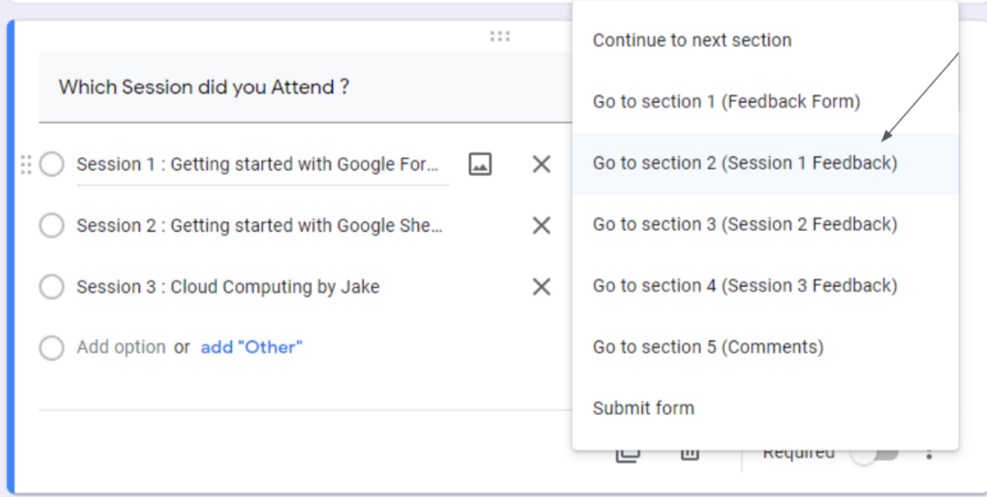
2. Section Branching and Skip Logic:
Take advantage of section branching and skip logic to create dynamic forms. Depending on how respondents answer specific questions, you can direct them to different sections of the form or skip irrelevant sections. This keeps surveys concise and tailored to each respondent.
3. File Uploads:
If you need respondents to submit files or documents (such as resumes, images, or documents), consider using the “File Upload” question type. This is particularly useful for job applications or project submissions.
4. Add-Ons and Integrations:
Explore Google Forms add-ons and integrations to extend functionality. For example, you can use add-ons like “Form Publisher” to automatically generate documents or certificates based on form responses. Integrating with Google Sheets, Google Drive, or third-party apps can streamline data management and analysis.

5. Collaboration:
Google Forms supports collaborative form creation. Multiple users can work on the same form simultaneously. Utilize this feature to gather input and insights from team members when designing surveys or questionnaires.
6. Question Piping:
Question piping allows you to insert responses from previous questions into subsequent questions or messages. This personalizes the form for respondents and can lead to more engaging and relevant interactions.
7. Randomize Question Order:
To reduce bias in surveys, you can randomize the order of questions. This ensures that respondents see questions in different sequences, minimizing the impact of question order on their responses.
8. Time Limits:
If your form is time-sensitive (e.g., a quiz or test), you can set time limits for respondents to complete it. This can be helpful in educational settings or for online assessments.
9. Pre-filled Forms:
Generate pre-filled links to forms for specific individuals. This allows you to populate certain fields with known information, making it more convenient for respondents. For instance, you can pre-fill a respondent’s name and email address if you already have this data.
10. Theme Customization:
Google Forms offers limited theme customization options. However, you can use CSS to further customize the appearance of your forms, including fonts, colors, and backgrounds. Note that this requires some coding knowledge.
11. Data Analysis and Visualization:
Leverage the power of Google Sheets for in-depth data analysis and visualization. Responses are automatically collected in a linked Google Sheets spreadsheet, allowing you to create charts, graphs, and pivot tables to gain insights from your data.
12. Notifications and Alerts:
Set up email notifications to receive alerts whenever a form is submitted. This can be especially useful for time-sensitive surveys or when you want to monitor responses in real-time.
13. Export Options:
Google Forms allows you to export responses to various formats, including PDF, CSV, and Excel. Choose the format that best suits your needs for reporting and sharing data with others.
14. Accessibility:
Ensure your forms are accessible to all respondents, including those with disabilities. Google Forms provides built-in accessibility features, such as keyboard navigation and screen reader compatibility. Test your forms for accessibility to ensure a seamless experience for all users.
15. Privacy and Data Security:
Be mindful of data privacy and security when collecting information through Google Forms. Ensure that you comply with relevant data protection laws and Google’s privacy policies. Consider anonymizing or aggregating data when necessary to protect respondents’ privacy.
By implementing these advanced strategies and considering the diverse features and possibilities of Google Forms, you can create sophisticated surveys, quizzes, and data collection forms tailored to your specific goals and requirements. Google Forms is a versatile tool that can be used for a wide range of applications, from academic research to customer feedback and event registrations.
Where can google form used
Multilingual Surveys:
If your target audience speaks different languages, consider creating multilingual surveys. You can provide language-specific versions of the same survey within a single form. Use section branching to direct respondents to the appropriate language section based on their preferences.
Advanced Question Types:
In addition to basic question types, Google Forms offers more advanced options such as Likert scales, multiple-choice grids, and date/time selection. These question types allow for more nuanced and specific responses, making them suitable for in-depth research or feedback collection.
Advanced Data Analysis Tools:
When analyzing responses in Google Sheets, take advantage of advanced data analysis tools like pivot tables, data validation, and conditional formatting. These tools can help you extract valuable insights and visualize data patterns.
Collaboration with Google Workspace:
If you’re using Google Workspace (formerly G Suite), you can seamlessly collaborate on Google Forms with your team. Share access to form editing and responses with specific team members, ensuring efficient collaboration on data collection and analysis.
Surveys for Offline Use:
Google Forms typically require an internet connection for respondents to submit their answers. However, you can use Google Forms add-ons or third-party apps to enable offline data collection. This can be especially useful for fieldwork or events with limited connectivity.
Scripting and Automation:
Google Forms can be extended with Google Apps Script, a JavaScript-based language. With scripting, you can automate various tasks, such as sending custom email responses to respondents, integrating with external databases, or dynamically updating form content based on responses.
Advanced Sharing Options:
Explore advanced sharing options beyond the typical email or link sharing. Google Forms allows you to embed forms on websites or generate QR codes for quick access. You can also limit form access to specific individuals by requiring them to sign in with their Google accounts.
User Authentication:
For added security and to prevent multiple submissions from the same user, enable user authentication. This feature requires respondents to sign in with their Google accounts before accessing the form.
Offline and Mobile Forms (Google Forms for Mobile):
Google Forms has a mobile app that allows you to create and fill out forms on your smartphone or tablet. This can be convenient for capturing data while on the go, whether you’re conducting surveys at events or gathering field data.
GDPR and Data Privacy Compliance:
If you collect data from respondents in the European Union, ensure that your Google Forms and data handling practices comply with the General Data Protection Regulation (GDPR) or relevant data privacy laws. Be transparent about data collection and obtain consent when necessary.
Backup and Data Retention:
Regularly back up your form data by exporting responses to Google Sheets or other storage solutions. Implement data retention policies to manage and safeguard collected data appropriately.
Custom Scripts for Form Submission:
Advanced users can create custom scripts to enhance the form submission process. For example, you can develop a script to send automated follow-up emails to respondents based on their answers or to generate customized reports.
Advanced Reporting:
Consider using data visualization tools and advanced reporting platforms to analyze and present your Google Forms data. Tools like Google Data Studio can help you create interactive dashboards and share insights with stakeholders.
Google Forms is a versatile tool with advanced features and customization options that cater to a wide range of data collection needs. By leveraging these advanced strategies and features, you can optimize your use of Google Forms for research, feedback collection, event registration, and more. Continuously exploring new possibilities and staying updated with Google Forms enhancements can further enhance your data collection and analysis capabilities.
How to Create a Google Form: A Step-by-Step Guide
Google Forms is a powerful and user-friendly tool for creating online surveys, quizzes, registration forms, and more. Whether you’re planning an event, conducting market research, or collecting feedback, Google Forms simplifies the process. In this step-by-step guide, we’ll walk you through how to create a Google Form effortlessly.
Step 1: Access Google Forms
- Sign In: Ensure you are signed in to your Google account. If you don’t have one, you can easily create it.
- Access Google Forms: Open your web browser and go to Google Forms by typing “forms.google.com” in the address bar or by visiting the Google Apps menu (represented by nine dots) and selecting “Forms.”
Step 2: Create a New Form
- Click on “+ Blank”: On the Google Forms homepage, click the “+ Blank” option to start a new form from scratch.
Step 3: Add Questions
- Add Your First Question: In the untitled form, click on “Untitled Question” to add your first question. You can type your question and select the question type (multiple-choice, short answer, etc.) from the options.
- Additional Questions: Continue adding questions by clicking the “+” button next to your existing question. You can also use the “Add image” button to include pictures or videos in your questions.

Step 4: Customize Your Form
- Form Title: Click on “Untitled form” at the top-left corner to give your form a title. You can also add a description if needed.
- Theme: Click on the color palette icon to select a theme and personalize the appearance of your form.
- Settings: Use the gear-shaped “Settings” icon to configure settings such as collecting email addresses, limiting responses, or shuffling question order.
Step 5: Organize and Structure Your Form
- Sections: Create sections to group related questions together. Click the “Section” button to add a new section to your form. This is especially useful for longer surveys.
Step 6: Preview Your Form
- Preview: Before sharing your form, click the “eye” icon at the top-right corner to preview how it will appear to respondents. This allows you to check for any errors or formatting issues.
Step 7: Add Logic and Branching (Optional)
- Logic: To add conditional logic or branching to your form (where respondents see different questions based on their previous answers), click the three-dot menu on a question and select “Go to section based on answer.”
Step 8: Share Your Form
- Share Button: Click the “Send” button at the top-right corner to share your form. You can send it via email, generate a shareable link, or embed it on a website.
- Collect Responses: Choose how you want to collect responses. Responses are automatically collected and stored in a Google Sheets spreadsheet associated with your Google Form.
Step 9: Analyze Responses
- View Responses: To view responses, click the “Responses” tab in your Google Form. You can visualize data using charts or export responses to Google Sheets for more in-depth analysis.
Step 10: Review and Edit
- Editing: You can edit your form even after you’ve shared it. Any changes you make will be reflected in real-time, so there’s no need to create a new form if you want to make adjustments.
Step 11: Close the Form (Optional)
- Close Form: If you want to stop accepting responses, you can close the form by clicking the “Accepting responses” toggle at the top-right corner. This is useful for time-sensitive surveys or events.
Step 12: Download a Summary (Optional)
- Summary of Responses: To quickly analyze and share a summary of responses, click the green sheets icon in the “Responses” tab and select “Download responses summary.”